What Are Probiotics?
What are probiotics? Probiotics are beneficial bacteria that can help [...]
linksy domain was triggered too early. This is usually an indicator for some code in the plugin or theme running too early. Translations should be loaded at the init action or later. Please see Debugging in WordPress for more information. (This message was added in version 6.7.0.) in /home/sites/36b/b/b62134768b/public_html/avada/wp-includes/functions.php on line 6260Avada domain was triggered too early. This is usually an indicator for some code in the plugin or theme running too early. Translations should be loaded at the init action or later. Please see Debugging in WordPress for more information. (This message was added in version 6.7.0.) in /home/sites/36b/b/b62134768b/public_html/avada/wp-includes/functions.php on line 6260What are probiotics? Probiotics are beneficial bacteria that can help maintain a healthy balance of bacteria in your dog’s gut. These bacteria are important for digestion and can help keep your dog’s immune system healthy. Probiotics can be found in certain foods, such as yogurt, kefir, and sauerkraut, or can be taken as a supplement.
What are probiotics? Probiotics are beneficial bacteria that can help [...]
Your Content Goes Here - Alert content [...]
Your Content Goes Here – Flip Box Content











Your Content Goes Here – Popover Content
What are probiotics? Probiotics are beneficial bacteria that can help maintain a healthy balance of bacteria in your dog's gut. These bacteria are important for digestion and can help keep your dog's immune system healthy. [...]
Your Content Goes Here - Alert content Your Content Goes Here - Button Text Your Content Goes Here - Checklist Your Content Goes [...]
As our dogs age, their health needs change. Senior dogs require different care than younger dogs, and it's important for pet owners to understand and address these needs. In this article, we'll discuss how [...]
| Column 1 | Column 2 |
|---|---|
| Column 1 Value | Column 2 Value |
Your Content Goes Here – Tagline Content
Text block.
Your Content goes here.
Search is how most users find relevant and interesting content on your site. If they can’t easily find what they’re looking for, then they may move on to a different website.
In this article, we’ll show you how to improve your website search by creating a custom WordPress search form.
how to create a custom wordpress search
WordPress comes with a built-in search feature. However, this default search is quite limited and doesn’t always provide the most accurate results.
It also doesn’t search all types of content such as comments, product reviews, or custom post types. This may stop the visitor from finding what they’re looking for, including products and services they want to buy.
If you run an online store or a paid membership site, then you may be losing out on sales due to these limits.
You may also want to prioritize some content over others, so that it appears higher in the search results. For example, you may want to show your site’s latest posts at the top of the search results page, or display your most popular WooCommerce products.
Sadly, there’s no way to customize the WordPress search algorithm so that it better meets your website’s needs.
That being said, let’s take a look at how to customize the WordPress search form and results page, step-by-step.
We cover a lot of ground in this post, so you can use the following links to jump to any section:
The easiest way to create a custom WordPress search form is by using SearchWP. SearchWP is the best WordPress search plugin. It’s easy to use and gives you complete control over your site’s search algorithm, so you can help visitors find what they’re looking for, fast.
The first step is to install the plugin. For more details, see our step-by-step guide on how to install a WordPress plugin.
Upon activation, select SearchWP from the left-hand menu. Then, click on the ‘Support’ tab.
You can now add the license key to the ‘License’ field and click on the ‘Activate’ button.
You’ll find the license key by logging into your SearchWP account.
Customizing the Search Engine
After that, you can create a new search engine by clicking on the ‘Engines’ menu option.
Here, go ahead and click on the ‘Add New’ button.
This will create a new search engine called ‘supplemental.’
To change the default name, simply click ‘Sources & Settings’ next to ‘Supplemental.’
In ‘Engine Label,’ type in the name you want to use for the search engine.
We’re going to use ‘Custom’ for this tutorial, but you can call the search engine anything that helps you identify it in the WordPress dashboard.
You’ll be using this name in our code snippet, so make a note of it.
At this point, you can choose whether you want to include posts, pages, media files, comments, and users in your site’s search results.
Depending on the WordPress plugins you’ve installed, you may see some extra options. For example, if you’re using WooCommerce then you can include ‘Products’ in the SearchWP search results.
For more on this topic, see our guide on how to make a smart WooCommerce product search.
You’ll also notice that ‘Keyword Stems’ is selected by default. This means SearchWP may include results that don’t have the same ending as the search term.
For example, if you search for ‘run’ then keyword stemming will include ‘running,’ and ‘runners’ in the results.
This can help show relevant results to visitors, so we recommend leaving the ‘Use keyword stems’ box checked. However, you can uncheck it if you want to show exact matches only.
When you’re happy with the information you’ve entered into the popup, click on ‘Done.’
You’ll now see sections for Posts, Pages, Media, and any other sources you selected.
Each section has its own ‘Applicable Attribute Relevance’ sliders.
These control how SearchWP values the different attributes when creating its search results page. For example, if you want the post title to carry more weight than the content, then you should drag the sliders accordingly.
In the following image, the search engine will place more value on matches that it finds in the post title, compared to matches that it finds in the post’s content.
You can use these sliders to fine-tune your site’s search algorithm. This may seem daunting, but you can adjust these sliders at any point. In this way, you can continuously fine-tune how search works on your site, to deliver the best results.
You can also create rules that determine whether certain content is included or excluded from the search results. For example, if you have an online marketplace then you may want to exclude the account page, checkout page, and thank you page.
Simply click the ‘Edit Rules’ button in the section where you want to create the rule. For example, in the following image, we’re adding a new rule to the ‘Posts’ section.
You’ll see a popup letting you know that the search engine doesn’t have any rules.
To go ahead and create the first rule, click on the ‘Add Rule’ button.
You can create rules for categories, tags, format, publish date, and ID.
By default, the plugin will include this content in its search results.
However, if you want to exclude this content instead, then click on the dropdown that displays ‘Only show entries if’ and then choose ‘Exclude entries if.’
Also, you might want to let your visitors limit their searches to specific categories. For example, you could add a category search feature to your archive pages. To learn how to do that, please see our guide on how to search by category in WordPress.
Once you’re happy with how the rule is set up, click on ‘Add Rule.’
To create more rules, simply repeat the exact steps described above. When you’ve finished adding rules for this content type, click on the ‘Done’ button to close the popup.
You can now create rules for other content types such as media and pages, by scrolling to their sections and clicking on their ‘Add Rule’ buttons.
When you’re happy with how your custom search engine is set up, click on the ‘Save Engines’ button at the top of the page.
If you see a message asking you to rebuild the index, then click on the ‘Rebuild Index’ button.
This process may take a few minutes depending on the size of your database.
Adding the Search Form with Shortcode
The easiest way to add the form to your website is by using the Shortcodes extension.
To install this SearchWP addon, head over to SearchWP » Shortcodes. You can then scroll to the ‘Shortcodes’ section and click on its ‘Install’ button.
You can now add the form to any page post, or widget-ready area using some code. If you haven’t used shortcodes before, then please see our beginner’s guide on how to add a shortcode in WordPress.
As an example, we’ll add the form to a post, but the steps will be mostly the same for pages and widget-ready areas.
Simply open the post where you want to show the form, and then click on the ‘+’ button. In the popup that appears, type in ‘Custom HTML.’
When the Custom HMTL block appears, click to add it to the post.
After that, paste the following code into the block:
| 1
2 3 4 5 6 7 8 9 10 11 12 13 14 15 16 17 18 19 |
[searchwp_search_form engine=”custom” var=”searchvar” button_text=”Custom Search”]
<div> [searchwp_search_results engine=”custom” var=”searchvar” posts_per_page=4] <h2>[searchwp_search_result_link direct=”true”]</h2> [searchwp_search_result_excerpt] [/searchwp_search_results] </div>
<div> [searchwp_search_results_none] No results found, please search again. [/searchwp_search_results_none] </div>
<div> [searchwp_search_results_pagination direction=”prev” link_text=”Previous” var=”searchvar” engine=”custom”] [searchwp_search_results_pagination direction=”next” link_text=”Next” var=”searchvar” engine=”custom”] </div> |
This code will add your custom search form to the post, create a section to display the search results, and add pagination if the results cover multiple pages.
If you gave your search engine a different name, then you’ll need to replace engine=“custom” in the above snippet.
The code also creates a search button with a ‘Custom Search’ label. If you want to use a different label instead, then simply change the text inbutton_text=“Custom Search”.
After that, click on the ‘Publish’ or ‘Update’ button to make the custom search form live.
To see the search form in action, simply visit the post on your WordPress website.
Your WordPress theme controls how every part of your site looks, including the search form and search results page. However, it is possible to customize the search bar’s appearance using custom CSS.
The easiest way to add custom CSS in WordPress is by using WPCode.
WPCode is the best code snippets plugin used by over 1 million WordPress websites. It makes it easy to add custom code in WordPress without having to edit the functions.php file.
With WPCode, you can edit a website’s code without risking mistakes and typos that can cause many common WordPress errors.
The first thing you need to do is install and activate the free WPCode plugin. For more details, see our step-by-step guide on how to install a WordPress plugin.
Upon activation, head over to Code Snippets » Add Snippet.
Here, simply hover your mouse over ‘Add Your Custom Code.’
When it appears, click on ‘Use snippet.’
To start, type in a title for the custom code snippet. This can be anything that helps you identify the snippet in the WordPress dashboard.
After that, open the ‘Code Type’ dropdown and select ‘CSS Snippet.’
You can now add the custom CSS code to the ‘Code Preview’ field.
To help you out, we’ve created a sample code snippet that changes the style of the search form and the search results page. You can tweak this snippet to use different colors, padding, borders, and more.
| 1
2 3 4 5 6 7 8 9 10 11 12 13 14 15 16 17 18 19 20 |
.searchform {
font-family:arial; font-size:16px; background:#ace5e3; color:#ffffff; border:1pxsolid#61c3c0; padding:10px; height:90px; width:600px; }
.search-results { font-family:arial; font-size:16px; background:#ace5e3; color:#000000; border:1pxsolid#61c3c0; padding:10px; width:600px; } |
You can also delete any lines that you don’t want to use. For example, if you don’t want to change the search form’s height and width, then simply delete those lines.
When you’re happy with the snippet, scroll to the ‘Insertion’ section. WPCode can add your code to different locations, such as after every post, on the front-end of your site only, or only in the admin area.
You will want to use the custom CSS code across your entire WordPress blog, so click on ‘Auto Insert’ if it isn’t already selected. Then, open the ‘Location’ dropdown menu and choose ‘Site Wide Header.’
After that, you’re ready to scroll to the top of the screen and click on the ‘Inactive’ toggle, so it changes to ‘Active.’
Finally, click on ‘Save Snippet.’
This will make the custom code live.
Now if you take a look at the custom search form, you’ll see the new style in action.
After placing the custom search form on your website, you may want to enable live Ajax search.
This automatically shows possible search results as the user types in your custom form, similar to how search engines such as Google work.
You can add Ajax live search to your custom form using the free SearchWP Live Ajax Lite Search plugin.
For step-by-step instructions on how to install it, see our guide on how to add live Ajax search to your WordPress site.
Next, it’s a good idea to enable some settings that will make it easier for users to find what they’re looking for.
To do this, go to SearchWP » Settings and click on the ‘Advanced’ tab.
You can now click to check any of the options that you’d like to use on your site. This includes enabling partial matches, which will display results that aren’t an exact match.
If you want to offer spell checking and typo correction, then we recommend checking the ‘Partial matches’ and ‘Automatic “Did you mean?” corrections’ boxes. This will suggest a slightly different search term if it matches more posts on your website.
Finally, ‘quoted/phrase searches’ allows visitors to use quotes when searching for exact phrases.
This is particularly useful if you run an online store, as customers can search for an exact brand name or model number.
Once you’ve created a custom WordPress search form, it’s a good idea to track how people are using it. This will give you a better insight into the kind of content people are looking for, which may even give you some ideas for new content.
You can also look for any problems people are having with the custom search form and ways to improve the search experience.
SearchWP comes with a search metrics extension that shows exactly how your website search is performing. To see these statistics, simply go to SearchWP » Statistics.
You can use the search metrics to improve the search results. For example, you might find the content that gets the most clicks and then customize the SearchWP settings to place this content at the top of the search results.
Ecommerce websites can also use exit-intent popups and gamified spin a wheel campaigns to make their search pages more engaging and convert visitors into email subscribers.
We hope this tutorial helped you learn how to create a custom WordPress search form. You may also want to see our picks of the best live chat software for small businesses and our guide on how to get a free business email address.
If you liked this article, then please subscribe to our YouTube Channel for WordPress video tutorials. You can also find us on Twitter and Facebook.[/fusion_builder_column][/fusion_builder_row][/fusion_builder_container]
]]>WordPress may sometimes show an error message saying, ‘There has been a critical error on this website. Please check your site admin email inbox for instructions.’ It will also include a link to the WordPress debugging guide.
In this guide, we will show you how to fix the critical error in WordPress. We will also talk about what causes this error and how to avoid it.
wordpress-critical-error
The critical error in WordPress is an error that stops WordPress from loading all the scripts it needs to work correctly.
Previously, this WordPress error resulted in a white screen of death or a fatal error message on the screen. Most beginners didn’t find it very helpful and struggled to resolve the issue on their own.
Since WordPress 5.2, users will now see a generic error message: ‘There has been a critical error on this website. Please check your site admin email inbox for instructions’ with a link to the WordPress debugging guide.
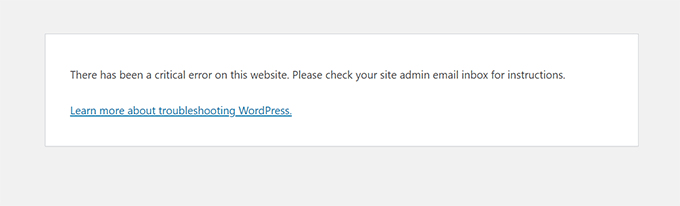
critical error wordpress
It will also send an email message to your WordPress site’s admin email address.
This email includes more details about the plugin or theme causing the error and a link to access your WordPress dashboard in recovery mode.
Another variant of this error will only show that your website is facing a critical error. It will not instruct you to check your email address.
This can happen because WordPress wasn’t able to load the files it needed to make the recovery mode available or to send the email.
The critical error in WordPress is generally caused by a malfunctioning plugin, script, or code that prevents WordPress from functioning correctly.
Due to the malfunctioning code, WordPress is unable to load the files it needs.
If you recently copied and pasted code snippets from a tutorial to your website, they might trigger a critical error.
All top WordPress plugins are thoroughly tested, so they are less likely to cause a critical error. However, a conflict with another WordPress plugin or some custom code may trigger the error.
Let’s look at how to fix the critical error in WordPress and get your website back.
The critical error message itself is not very useful for finding and fixing the issue’s cause. Luckily, WordPress also sends an email to the admin email address of your website.
Many WordPress websites are not configured to send emails using SMTP. Due to this reason, they may not get an email despite WordPress telling them that it has sent an email.
Similarly, some WordPress sites may only see the critical error message without instructions to check the email. That’s because WordPress wasn’t able to load files it needed to send an email or make recovery mode available.
If you are among those users, don’t worry. We will show you how to fix the critical error even without the email.
On the other hand, if you received the WordPress technical issue email notification, then we will show you how to make sense of it and use it to bring your website back.
Simply click the links below to skip straight to the section you need:
First, you need to visit the inbox for your website’s WordPress administration email address.
Are you unsure which email address you used as the admin email? It is the email address you provided when installing WordPress.
If your site is on Bluehost or you used a WordPress auto-installer, your admin email address will likely be the same one you used for your WordPress hosting account.
You will see an email in your inbox with the subject line, ‘Your Site is Experiencing a Technical Issue.’ Inside it, you will find more helpful information about what caused the critical error on your WordPress website.
For instance, the following screenshot shows that the critical error was caused by the WordPress theme on our test site.
The email also includes a unique link that will allow you to log in to your WordPress website in recovery mode to investigate and fix the issue.
At the bottom of the email, you will see even more detailed information about the error, including the specific file and code that triggered it.
In the example below, some code on line 614 of our theme’s functions.php file is responsible for triggering the error.
Here is another example showing an error caused by a malfunctioning WordPress plugin.
As you can see, the message highlights the plugin name and the line of code causing the error.
Now, you just need to click on the link to WordPress recovery mode, which will take you to your WordPress admin area.
You will be asked to log in to continue.
Once you are logged in, you will see a notification telling you about the critical error, what caused it, and a link to where you can go to fix it.
For instance, in the following screenshot, WordPress is notifying us about the critical error caused by the plugin with a link to the Plugins page.
If you click the link, it will show you the problem plugin. It will also show you exactly which line of code caused the error.
You can go ahead and deactivate the plugin for now by clicking on ‘Deactivate’.
Then you can simply look for an alternative WordPress plugin or see if you can get support from the plugin developers.
Similarly, you will see a link to the Themes page if the problem lies with your theme. At the bottom of the page, it will say which theme is causing the issue.
You can change your WordPress theme. Alternatively, you can delete the broken one and reinstall a fresh copy of it from the official source to see if that resolves the issue.
Once you have addressed the issue, click on the ‘Exit Recovery Mode’ button at the top.
In most cases, your WordPress website would now start working normally.
However, if you still see the critical error in WordPress, you can try the troubleshooting steps in the next section.
If you didn’t receive the WordPress critical issue notification email, then this method will teach you how to troubleshoot and fix the critical error in WordPress.
If the error was caused by a recent action you took, then you can undo that action to fix the issue.
For example, if you installed a new plugin and activating it caused the critical error, then you just need to deactivate it (we will show you how to do that in the first step below).
On the other hand, if you are unsure what caused the error, you can simply follow these steps.
1. Deactivate All WordPress Plugins
The easiest way to disable a faulty WordPress plugin is by deactivating it. However, due to the critical error, you won’t have access to the admin area or know which plugin to deactivate.
To address this, we will deactivate all WordPress plugins. Don’t worry, you can easily reactivate them once you get access to your WordPress admin area.
Simply connect to your WordPress website using an FTP client or the File Manager app in your web hosting control panel.
Once connected, you need to navigate to the wp-content folder.
Inside the wp-content folder, you will see a folder called ‘plugins’. You need to right-click on it and then select the ‘Rename’ option.
Next, change the ‘plugins’ folder name to anything you like. In our example, we will call it ‘plugins.deactivated’.
WordPress looks for the plugins folder to load the activated plugins on your website. When it cannot find the plugins folder, it simply cannot activate them and automatically sets them as deactivated.
You can now visit your website to see if the critical error message has disappeared.
Important: Don’t forget to rename the ‘plugins’ folder if the critical error issue has been resolved. WordPress will then recognize the folder, and you can reactivate the plugins one by one from the WordPress dashboard to identify which one caused the critical error.
For more details, see our tutorial on how to deactivate all WordPress plugins.
2. Switch to a Default Theme
The next step in troubleshooting the critical error is switching your WordPress theme to a default one. This will fix the critical error issue if some code in your current WordPress theme is causing the problem.
Simply go to the WordPress.org theme directory and download a fresh copy of a default theme like Twenty Twenty-Two or Twenty Twenty-Three.
Next, you need to unzip the theme file to your computer.
This will create a folder with the theme name on your computer.
Now, you need to connect to your WordPress site using an FTP client or the File Manager app in your hosting control panel.
Once you have connected, navigate to the /wp-content/themes folder, and you will see a list of all the themes installed on your website.
Go ahead and download all of these folders to your computer as a backup.
After that, you need to delete all the theme folders from your website.
Your WordPress site now doesn’t have a theme installed.
To fix this, upload the default theme folder you downloaded earlier.
Once this process has finished, you can try visiting your website.
If your WordPress theme caused the critical error, then the error message should have disappeared, and you will be able to access your website.
3. Reinstall WordPress
A corrupt WordPress core file or malware could also trigger a critical error in WordPress. The easiest way to fix this is by reinstalling WordPress.
Simply go to WordPress.org and download a fresh copy of WordPress to your computer.
After downloading the file, you need to unzip it to your computer. This will create a folder called ‘wordpress’, which contains all the files you need for the reinstall.
Next, connect to your WordPress site using an FTP client or the File Manager app in your hosting control panel.
Once connected, navigate to the root folder of your website. This is the folder that contains the wp-admin, wp-content, wp-includes, and wp-admin folders.
Now select the files inside the ‘wordpress’ folder on your computer and upload them to your website.
Your FTP client will ask if you want to overwrite these files or skip them. You need to select ‘Overwrite’ and check the box next to ‘Always use this action’.
Then, simply click on the ‘OK’ button to continue. Your FTP client will now replace your core WordPress files with fresh copies from your computer.
Once it has finished, you can try visiting your website to see if this resolves the error.
If the critical error was caused by a corrupt WordPress core file or malware, then the error message should disappear now.
4. Turn On Debugging in WordPress
WordPress comes with a built-in debugging system that allows you to catch errors, log them, and troubleshoot issues.
To turn it on, you need to edit the wp-config.php file. Just locate the following line:
| 1 | define( ‘WP_DEBUG’, false ); |
Now, go ahead and replace this line with the following code:
| 1
2 3 4 |
define( ‘WP_DEBUG’, true );
define( ‘WP_DEBUG_DISPLAY’, true ); define( ‘WP_DEBUG_LOG’, true ); define( ‘SCRIPT_DEBUG’, true ); |
If you visit your WordPress website now, it will show you debugging information and the critical error message.
Debug mode not only shows errors but warnings and notices too. This helps you find out what is causing the problem so that you can fix it.
5. Increase PHP Memory Limit
Your web hosting server is like any other computer. It needs memory to efficiently run multiple applications at the same time.
If your server doesn’t have enough resources to run PHP, then it may crash or become unresponsive. This could trigger a critical error in WordPress.
To fix this, you can increase the PHP memory limit by telling your hosting server to use more memory for PHP.
You can do that by entering the following line into your wp-config.php file.
| 1 | define( ‘WP_MEMORY_LIMIT’, ‘512M’); |
Don’t forget to save and upload your changes to the server.
For more details, you can see our tutorial on how to increase PHP memory limit in WordPress.
Now, you can try visiting your website to see if this has resolved the critical error.
6. Upgrade Your PHP Version
WordPress requires PHP version 7.4 or greater. If your WordPress hosting server uses an older version of PHP, it may not work well and cause a critical error.
If you have access to the WordPress recovery mode, you can see which PHP version your site is using by visiting the Tools » Site Health page and switching to the Info tab.
From here, scroll down to the Server section and click to expand it.
There, you will see the PHP version installed on your hosting server.
If it is lower than 7.4, then you need to update the PHP version.
Most good WordPress hosting companies allow you to easily do that from your hosting account control panel. For details, please see our article on how to update your PHP version on popular WordPress hosting platforms.
We hope this article helped you troubleshoot and fix the critical error in WordPress. You may also want to see our guide on how to get a free SSL certificate for your WordPress site or our expert comparison of the best business phone services for small businesses.
If you liked this article, then please subscribe to our YouTube Channel for WordPress video tutorials. You can also find us on Twitter and Facebook.
]]>You can download WordPress from WordPress.org.
WordPress is free, which means you won’t have to pay license fees to use it: you can just download it. It’s also open source, which means that you have access to the source code and are allowed to change it.
Because it’s open source, you aren’t tied to one vendor to set up a site in WordPress for you. If you’re no longer happy with your developer or development agency, you can switch to another agency and they should be able to continue the work on your existing site.
WordPress can be extended through themes, for design purposes, and through plugins, for basically everything else. Using these extensions, you can add content types, forms, job boards, you name it.
At WordPress.org you can find themes and plugins. At Yoast, we maintain several WordPress plugins. Most of these add SEO functionalities to WordPress.
Out of the box, a WordPress site already has many SEO features that most other CMSes lack. It can generate nice URLs, clean HTML and has good support for, for instance, RSS feeds. Our own Yoast SEO is a plugin that adds extensive SEO features to WordPress, making it the best SEO platform in existence. Not that we’re biased ?
Because WordPress is open source, you are also not tied to one hosting company. We maintain a list of WordPress hosting companies that we have tested with our plugins and that use the latest available technology to host your site. Find that list here: WordPress hosting recommendations.
]]>